3D ANIMATION
Students are introduced to the advanced applications of Autodesk Maya in the areas of technical setup, character rigging and animation. Students will gain a foundation in planning, executing and solving the technical aspects in a three-dimensional (3D) pipeline, with a focus on maintaining a disciplined and logical workflow that integrates with the other aspects of pre-production, production and post-production. All projects will provide students with hands-on experience in incorporating various skills, platforms and mechanisms to achieve the desired impact in the marketplace.
SOON JIA YI
Year 3 - 3d models, rigging
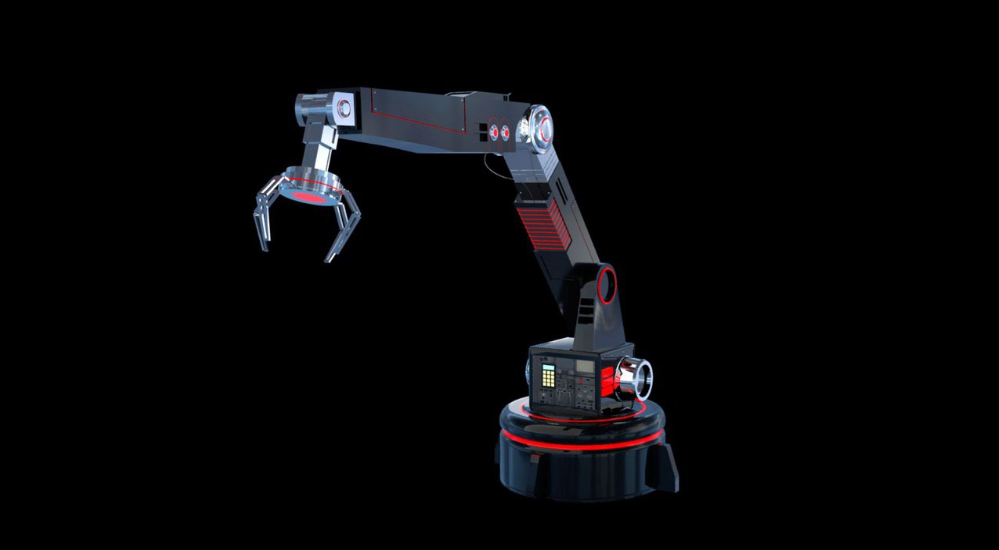
This robot arm was a 3D asset I created for a car commercial. At the pre-production stage, I embarked on thorough research as I really wanted to get the dimensions of the arm parts as proportionate as possible. Inspired by numerous robot arm designs online, I was confident to go into the planning stage. Once that stage was done, I modelled, textured and rigged the arm in Maya.
3D rigging is the process of creating the digital bones or skeleton of a 3D model. This skeleton is the structure that enables the model to be animated. Without a rig, it cannot be moved or manipulated.

LO KAI MAY
Year 3 - 3d models, rigging
Before the project, I sourced references of different machines. I took individual parts that I felt could be combined into an entirely new character. I proceeded to model this new machine from scratch, did the UV layouts as well as texturing. After that was done, I rigged the claws and arm mechanisms.
In VFX, we use the term UV a lot, it refers to the process of UV mapping, one of the most tedious tasks in 3D, but also one of the most crucial in the pursuit of realistic-looking models. UV mapping takes three steps. We 'paint' textures onto the 3D model first. We then export or output the textures as a flattened 2D image. Lastly, we map the realistic textures back so that it wraps around the 3D model.
SET EXTENSION
Students are introduced to the techniques of creating matte painting and set extension. Students are able to effectively plan or design and build a visually interesting matte painting to extend an existing environment that they have shot or built in computer-generated imagery (CGI). Students will also be advancing their skill set to integrate two-and three-dimensional (2D and 3D) elements for realistic digital content.
PANG RU SHUANG
Year 3- Set Extension + Rigging
This shot was pieced together in Unreal Engine 4 after I created each of the individual assets in Maya, and was textured by importing the UV files into Photoshop. It was important for me to add other assets that I had modelled as I wanted to showcase more of my original work, such as the garage and robot arm from my set extension and rigging projects.
Set extension expands a set digitally in place of building the whole actual scene in real-life. It creates the illusion of environments that may be too expensive to build, impossible to shoot at, or exist only in the imagination.
The film is first shot separately. After that, the extension usually involves building 3D models, using matte paintings and adding atmospheric effects which are then combined as layers with the original live-action footage. A matte painting is a painted landscape or scene. They may be framed and filmed on set, or drawn and blended in in post-production. Artists will have to carefully match camera angles and do colour corrections so that the combination will appear seamless.

SOON JIA YI
Year 3 - Set Extension + Rigging
This shot of a car is a CG asset that I textured and rigged in Maya. The car was then composited into a city that I set-extended in NUKE. I had fun combining all these elements to create the scene as realistically as I could. I put in much effort and paid attention to small details – such as the changing colours of the traffic lights and a man walking down the street. Incorporating these finishing touches brought more depth and vibrancy to the shot.
In CGI, a composite or 'comp' involves stitching two or more visual elements from different sources together into a single shot or scene.

HANIS YASMYN BTE AHMAD IBRAHIM
Year 3 - Set Extension + Rigging
Go behind-the-scenes in this breakdown video. After taking still shots of locations in school, I extended the set by compositing the tunnel, riverbed and extra foliage. To ensure everything looked realistic and blended well, I spent time colour correcting and grading, and added footage of smoke, floating particles and mood effects to the environment. This scene was put together using Adobe Photoshop and After Effects, and Autodesk Maya. I really enjoyed this project as it was a little break from the other things that we do. I used Photoshop quite a bit – being able to work on those skills really complemented my colour correction, 3D and camera projection skills.

EFFECTS ANIMATION
Through the breakdown of case studies from notable effects simulation examples, students are exposed to intermediate effects workflows, to build on their knowledge. The principle focus is on using Fluids, nParticles/Particles, Rigid/Soft Body Simulations in tandem, and overlaying different effects systems that interact with each other. The aim is to achieve realistic simulations of the structures and properties of matter, and their physical behaviours in motion or at changing states. These could include liquids, gas, melting ice, fire, dust, muscle, fur, fabric or foliage.
ONG CHIN
Year 3 - Effect Animation + Set Extension
Faithless is a 40-second trailer based on the horror theme, Apocalypse. During our extensive research, my team and I set out to imagine what a dystopian world might look like. We decided to stretch our creative limits by building a miniature set completely from scratch. Our abandoned church is set in a time void of human existence.
Everything was handmade using cardboard, tissue paper, plastic film, styrofoam, ice cream sticks and copious amounts of UHU glue. Specific objects requiring fine detailing such as the pedestal and cross were 3D printed.
While we constructed the set as a group, the production and post-production of the trailer was completed as an individual assignment. I filmed individual elements within the church with the RED camera, I keyed out the green screen from the shots during post-production and edited in Adobe After Effects, NUKE and Autodesk Maya.
Faithless was finally brought to life with special effects such as smoke, fog, overgrown plants, "God rays" and a final colour grading to achieve a warm tone.
"God rays" are lighting effects that mimic sunbeams at twilight. There are distinct light scatters and objects that block the light will cast well-defined shadows. It serves as a tool in lighting design to highlight the contrast between light and dark.
The RED camera is one of the defining moments of the VFX experience. It is a professional digital cinema camera that can shoot at an ultra-high-resolution a few times above high-definition.

ONG CHIN
Year 3 - Effect Animation + Set Extension
Faithless is a 40-second trailer based on the horror theme, Apocalypse. During our extensive research, my team and I set out to imagine what a dystopian world might look like. We decided to stretch our creative limits by building a miniature set completely from scratch. Our abandoned church is set in a time void of human existence.
Everything was handmade using cardboard, tissue paper, plastic film, styrofoam, ice cream sticks and copious amounts of UHU glue. Specific objects requiring fine detailing such as the pedestal and cross were 3D printed.
While we constructed the set as a group, the production and post-production of the trailor was completed as an individual assignment. I filmed individual elements within the church with the RED camera, I keyed out the green screen from the shots during post-production and edited in Adobe After Effects, NUKE and Autodesk Maya.
Faithless was finally brought to life with special effects such as smoke, fog, overgrown plants, "God rays" and a final colour grading to achieve a warm tone.
"God rays" are lighting effects that mimic sunbeams at twilight. There are distinct light scatters and objects that block the light will cast well-defined shadows. It serves as a tool in lighting design to highlight the contrast between light and dark.
The RED camera is one of the defining moments of the VFX experience. It is a professional digital cinema camera that can shoot at an ultra-high-resolution a few times above high-definition.
Combined Projects
VFX short films which showcase a refinement in skills as students incorporate different module projects and workflows together.

YONG YUN JING
Year 3 - Final Project
Taken Over is an extension of a combined project involving multiple modules – Compositing, Lighting and Rendering, Effects Animation, Special Effects and Post-Production. From surfacing the rocket model digitally to building the physical miniature set of the moon, it is one of my proudest works as I used several skill sets gained from my various modules and was able to successfully combine them into a single piece of work. I took time to add various small details during the compositing and post-production stages to reduce monotony.

TAN WEI KANG
Year 3 - Effect Animation + Set Extension
AGGRESS is a CG concept short film inspired by science-fiction and mecha, a genre about robots or machines. This is a personal project composed of CG elements, motion graphics and compositing – the three core skill sets that I have picked up in my three years of study.
